顯示具有 jQuery 標籤的文章。 顯示所有文章

2017年3月9日 星期四

基本的 jQuery 插件 - How to Create a Basic Plugin

Reference:
https://learn.jquery.com/plugins/basic-plugin-creation/
http://maidot.blogspot.tw/2011/04/jquery-this-this-different-between-this.html


1.創建一個基礎的jQuery plugin

-把我們創造的plugin加入至$.fn之中
(擴展$.fn.abc(),即$.fn.abc()是對jquery擴展了一個abc方法,那麼後面你的每一個jquery實例都可以引用這個方法了)
$.fn.greenify = function() {
    this.css( "color", "green" );
};
 
$( "a" ).greenify(); // Makes all the links green.

-注意這邊是使用css(),所以我們也用this,而非$(this),
因為在JQuery中this代表目前的DOM對象,$(this)代表我們用JQuery所選取的JQuery對象,
在上述方法中,this代表greenify(),而他與.css()都同屬同一個jQuery object的一部份


2.Chaining 讓自建jQuery plugin可與其他方法相連
新增一行『return this』把該jQuery Object 傳回
$.fn.greenify = function() {
    this.css( "color", "green" );
    return this;
}
 
$( "a" ).greenify().addClass( "greenified" );

3.確保plugin不會與其他JavaScript libraries產生衝突
(Protecting the $ Alias and Adding Scope)
在最外層多加一層$()宣告
(function ( $ ) {
 
    $.fn.greenify = function() {
        this.css( "color", "green" );
        return this;
    };
 
}( jQuery ));

4.讓一個plugin根據參數,做出不同的動作
(function( $ ) {
 
    $.fn.popup = function( action ) {
 
        if ( action === "open") {
            // Open popup code.
        }
 
        if ( action === "close" ) {
            // Close popup code.
        }
 
    };
 
}( jQuery ));

5.透過each(),對多個指定的DOM elements進行處理
$.fn.myNewPlugin = function() {
 
    return this.each(function() {
        // Do something to each element here.
    });
 
};
Notice that we return the results of .each() instead of returning this. Since .each() is already chainable, it returns this, which we then return. This is a better way to maintain chainability than what we've been doing so far.

.each() 方法,會遍歷jQuery對象中的每一個DOM元素
然後透過$(this) 將每一個取到的DOM變成jQuery Object
 return this.each(function() {
    var link = $(this);
    link.css("color", setting.color)
});
6.讓一個plugin接受『一組設定』
(function ( $ ) {
 
    $.fn.greenify = function( options ) {
 
        // This is the easiest way to have default options.
        var settings = $.extend({
            // These are the defaults.
            color: "#556b2f",
            backgroundColor: "white"
        }, options );
 
        // Greenify the collection based on the settings variable.
        return this.css({
            color: settings.color,
            backgroundColor: settings.backgroundColor
        });
 
    };
 
}( jQuery ));
Example usage:
$( "div" ).greenify({
    color: "orange"
});

defaults 設定的顏色透過$.extend()把覆蓋成傳進來的值
The default value for color of #556b2f gets overridden by $.extend() to be orange.

7.完整範例
my_plugin.js
(function($) {

    $.fn.greenify = function(action, options) {
        var setting = $.extend({
            color: "green",
            backgroundColor: "white"
        }, options);

        if (action === 'div') {

            return this.css({
                color: setting.color,
                backgroundColor: setting.backgroundColor
            });
        };

        if (action === 'a') {
            return this.each(function() {
                var link = $(this);
                link.css("color", setting.color)
            });

        }

    };

}(jQuery));
template.html
<!doctype html>
<html>

<head>
    <meta charset="utf-8">
    <script src="js/jquery-1.12.0.min.js"></script>
    <script src="js/my_plugin.js"></script>
    <script>
    $(document).ready(function() {
        $("a").greenify("a", {
            color: "red"
        });

        $("div").greenify("div", {
            color: "white",
            backgroundColor: "red"
        });
    });
    </script>
    <title>jQuery</title>

    <body>
        <a href="www.google.com.tw">GoogleGoog</a>
        <a href="www.yahoo.com.tw">YahooYahoo</a>
        <div>
            Hello
        </div>
    </body>

</html>

2016年12月20日 星期二

Word Cloud 文字雲 - jQCloud & WordCloud2

Sample Step:

1.Download word cloud jquery:
http://mistic100.github.io/jQCloud/#usage


2.Include package & jQuery CDN
- jqcloud.min.js- jqcloud.min.css
- jqcloud.min.js- jqcloud.min.js
- https://ajax.googleapis.com/ajax/libs/jquery/1.12.4/jquery.min.js

- 程式碼
<head>
 <meta charset="utf-8">
 <script src="https://ajax.googleapis.com/ajax/libs/jquery/1.12.4/jquery.min.js"> </script>
 <script src="jqcloud.min.js"></script>
 <link rel="stylesheet" href="jqcloud.min.css">
 <title>test</title>
</head>

3.設定『資料』 & 啟用文字雲
- 要記得給文字雲『範圍大小』,否則畫面上看不到
$('#keywords').jQCloud(words, {
  width: 500,
  height: 350
});

- 設定假資料
<script>
 $(function(){
  var words = [
    {text: "Lorem", weight: 13},
    {text: "Ipsum", weight: 10.5},
    {text: "Dolor", weight: 9.4},
    {text: "Sit", weight: 8},
    {text: "Amet", weight: 6.2},
    {text: "Consectetur", weight: 5},
    {text: "Adipiscing", weight: 5},
  ];

  <!-- $('#demo').jQCloud(words); -->
  
  $('#demo').jQCloud(words, {
    width: 600,
    height: 600
  });
 });
</script>

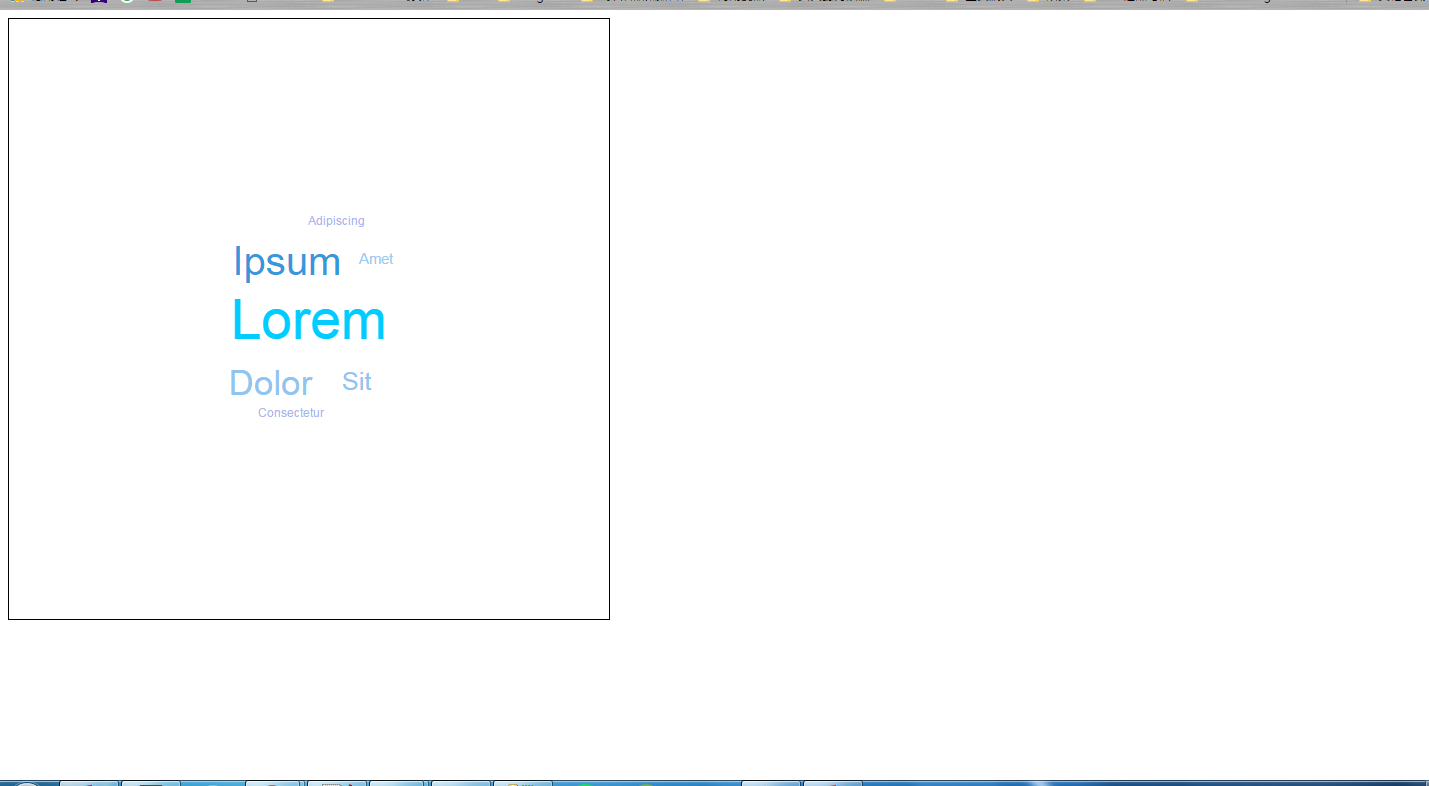
4.Result


5.Sample code
<!doctype html>
<html>
 <head>
  <meta charset="utf-8">
  <script src="https://ajax.googleapis.com/ajax/libs/jquery/1.12.4/jquery.min.js"> </script>
  <script src="jqcloud.min.js"></script>
  <link rel="stylesheet" href="jqcloud.min.css">
  <title>test</title>
 </head>
 
 <script>
 $(function(){
  var words = [
    {text: "Lorem", weight: 13},
    {text: "Ipsum", weight: 10.5},
    {text: "Dolor", weight: 9.4},
    {text: "Sit", weight: 8},
    {text: "Amet", weight: 6.2},
    {text: "Consectetur", weight: 5},
    {text: "Adipiscing", weight: 5},
  ];

  <!-- $('#demo').jQCloud(words); -->
  
  $('#demo').jQCloud(words, {
    width: 600,
    height: 600
  });
 });

 </script>
 <body>
  <div id="demo" style="border:thin solid black">
  </div> 
 </body>

</html>

6.Advance Skill 
[自訂設定]
- delay: 50 (字體顯示的速度)
- steps : Number of "steps" to map the words on, depending on their weight (大約會有幾種字體大小,會與自設的color進行比對)
- colors: 自訂顏色
-from-to: 字體最大-最小(根據container的大小)
$('#wordCloud').jQCloud(words, {
    delay: 50,
    width: 500,
    height: 500,
    autoResize: true,
    steps : 50,
    //最凸顯
    colors: ["#CC0066", "#CC0066", "#009999", "#009999", "#FFCC33", "#FFCC33", "#0099CC", "#0099CC", "#FF6666","#FF6666",
        "#FF33CC", "#FF33CC", "#FF6600", "#FF6600", "#009966", "#009966", "#CC6633", "#CC6633", "#FF6666","#FF6666",
        "#555555", "#555555", "#555555", "#555555", "#555555", "#444444", "#444444", "#444444", "#444444","#444444",
        "#666633", "#666633", "#666633", "#666633", "#666699", "#666666", "#666666", "#666666", "#666666","#666666",
        "#333333", "#333333", "#333333", "#333333", "#333333", "#999999", "#999999", "#999999", "#999999","#999999"
    ],
    fontSize: {
        from: 0.08,
        to: 0.02
    }
});

[文字雲特殊效果(字體隨滑鼠移出移入改變)]
//文字雲特殊效果
$(document).on('mouseenter','.jqcloud-word',function(){
    var font_size = parseFloat($(this).css("font-size"));
    var newSize = font_size + 10;
    $(this).css("font-size",newSize + 'px');
}).on('mouseout','.jqcloud-word',function(){
    var font_size = parseFloat($(this).css("font-size"));
    var newSize = font_size - 10;
    $(this).css("font-size",newSize + 'px');
});

[使用者可調整"字體顏色"、文字雲型狀]

1.按下"更新"
2.刪掉文字雲
3.重建文字雲
//delete
wordCloud.jQCloud('destroy');
//update word cloud
wordCloud.jQCloud(words, {
    delay: 40,
    width: width,
    height: height,
    autoResize: true,
    steps : 50,
    colors: colorStyle,
    shape: shape,
    fontSize: {
        from: 0.08,
        to: 0.02
    }
});

4.sample code
//文字雲update
$('#updateButton').on('click', function() {
    var wordCloud = $('#wordCloud');
    var selectColorStyle = $('#colorStyle').val();
    var selectShape = $('#shape').val();
    var colorStyle;
    //custom color style
    if (selectColorStyle == '1') {
        colorStyle = ["#CC0066", "#CC0066", "#009999", "#009999", "#FFCC33", "#FFCC33", "#0099CC", "#0099CC", "#FF6666","#FF6666",
            "#FF33CC", "#FF33CC", "#FF6600", "#FF6600", "#009966", "#009966", "#CC6633", "#CC6633", "#FF6666","#FF6666",
            "#555555", "#555555", "#555555", "#555555", "#555555", "#444444", "#444444", "#444444", "#444444","#444444",
            "#666633", "#666633", "#666633", "#666633", "#666699", "#666666", "#666666", "#666666", "#666666","#666666",
            "#333333", "#333333", "#333333", "#333333", "#333333", "#999999", "#999999", "#999999", "#999999","#999999"
        ];
    } else if (selectColorStyle == '2') {
        colorStyle = ["#CC0066", "#CC0066", "#009999", "#009999", "#FFCC33", "#FFCC33", "#0099CC", "#0099CC", "#FF6666","#FF6666",
            "#FF33CC", "#FF33CC", "#FF6600", "#FF6600", "#009966", "#009966", "#CC6633", "#CC6633", "#FF6666","#FF6666",
            "#3399CC", "#3399CC", "#CC6600", "#CC6600", "#999999", "#444444", "#444444", "#444444", "#444444","#444444",
            "#666633", "#666633", "#666633", "#666633", "#666699", "#666666", "#666666", "#666666", "#666666","#666666",
            "#333333", "#333333", "#333333", "#333333", "#333333", "#999999", "#999999", "#999999", "#999999","#999999"
        ];
    } else if (selectColorStyle == '3') {
        colorStyle = ["#CC0066", "#CC0066", "#009999", "#009999", "#FFCC33", "#FFCC33", "#0099CC", "#0099CC", "#FF6666","#FF6666",
            "#FF33CC", "#FF33CC", "#FF6600", "#FF6600", "#009966", "#009966", "#CC6633", "#CC6633", "#FF6666","#FF6666",
            "#3399CC", "#3399CC", "#CC6600", "#CC6600", "#999999", "#999999", "#CCCC33", "#CCCC33", "#CCCC33","#CCCC33",
            "#FF9933", "#FF9933", "#CC9999", "#CC9999", "#666699", "#666699", "#FF9900", "#FF9900", "#0099CC","#0099CC",
            "#CCCC99", "#CCCC99", "#FF6666", "#FF6666", "#FFCC99", "#FFCC99", "#CC3399", "#CC3399", "#99CC33","#99CC33"
        ];
    }
    //custom shape
    var width;
    var height;
    var shape;
    if (selectShape == '1') {
        width = 550;
        height = 400;
        shape = 'elliptic';
    } else if (selectShape == '2') {
        width = 500;
        height = 500;
        shape = 'elliptic';
    } else {
        width = 550;
        height = 400;
        shape = 'rectangular';
    }
    //delete
    wordCloud.jQCloud('destroy');
    //update word cloud
    wordCloud.jQCloud(words, {
        delay: 40,
        width: width,
        height: height,
        autoResize: true,
        steps : 50,
        colors: colorStyle,
        shape: shape,
        fontSize: {
            from: 0.08,
            to: 0.02
        }
    });
});

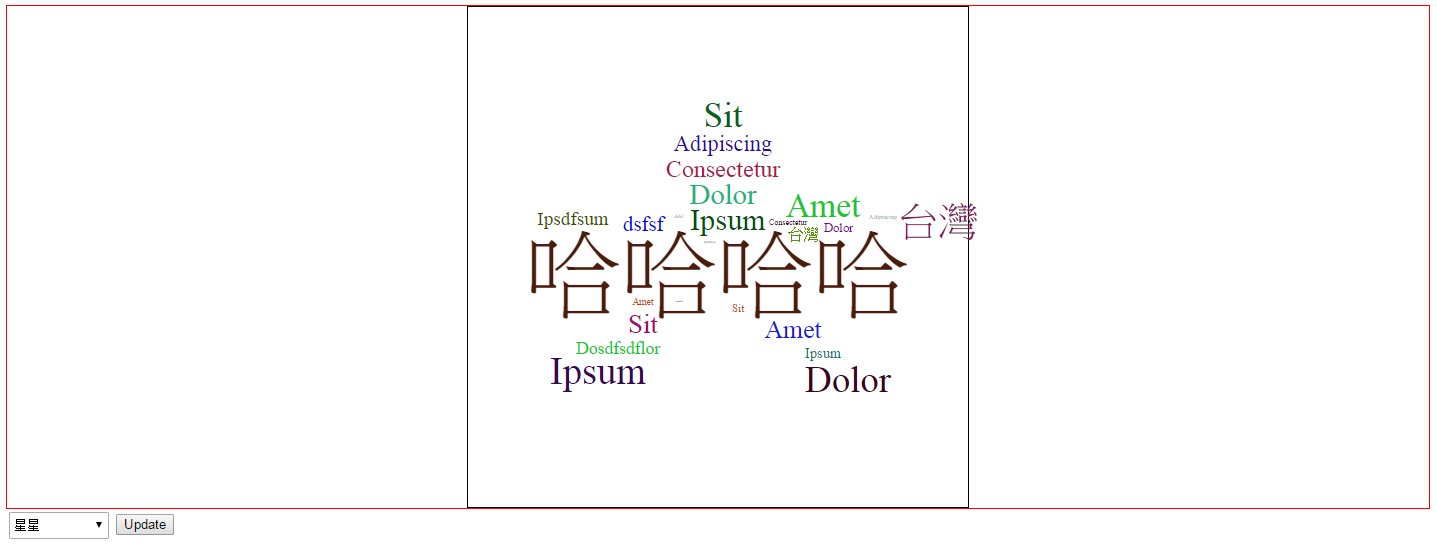
Word Cloud 2

1.下載:
https://timdream.org/wordcloud2.js/#red-chamber

2.Sample Code:
<!doctype html>
<html>
 <head>
  <meta charset="utf-8">
  <script src="https://ajax.googleapis.com/ajax/libs/jquery/1.12.4/jquery.min.js"> </script>
  <script src="wordcloud2.js"></script>
  <title>test</title>
 </head>
 
 <script>
 $(function(){
  var words = [
   ["哈哈哈哈",60],
   ["Ipsum",19],
   ["Dolor",18],
   ["Sit",17],
   ["Amet",16],
   ["Consectetur",15],
   ["Adipiscing",14],
   ["dsfsf",13],
   ["Ipsdfsum",12],
   ["Dosdfsdflor",11],
   ["台灣",10],
   ["Ipsum",9],
   ["Dolor",8],
   ["Sit",7],
   ["Amet",6],
   ["Consectetur",5],
   ["Adipiscing",4],
   ["dsfsf",3],
   ["Ipsdfsum",2],
   ["Dosdfsdflor",1],
   ["台灣",25],
   ["Ipsum",24],
   ["Dolor",23],
   ["Sit",22],
   ["Amet",21],
  ];

  WordCloud($('#wordCloud')[0], {
            list: words,
            classes: 'wordCloud',
            wait: 30,
            gridSize: 10,
            weightFactor: 1.6,
            fontFamily: 'Hiragino Mincho Pro, serif',
            color: 'random-dark',
            backgroundColor: '#FFFFFF',
            rotateRatio: 0
        });
        //文字雲update
        $('#updateButton').on('click', function() {
            //custom shape
            var selectShape = $('#shape').val();
            var shape;
            if (selectShape == '1') {
                shape = 'circle';
            } else if (selectShape == '2') {
                shape = 'star';
            } else if (selectShape == '3') {
                shape = 'pentagon';
            } else if (selectShape == '4'){
                shape = 'diamond';
            } else if (selectShape == '5') {
                shape = 'triangle';
            }
            WordCloud($('#wordCloud')[0], {
                list: words,
                classes: 'wordCloud',
                wait: 30,
                shape: shape,
                gridSize: 10,
                weightFactor: 1.6,
                fontFamily: 'Hiragino Mincho Pro, serif',
                color: 'random-dark',
                backgroundColor: '#FFFFFF',
                rotateRatio: 0
            });
        });
        //文字雲特殊效果
        $(document).on('mouseenter','.wordCloud',function(){
            var font_size = parseFloat($(this).css("font-size"));
            var newSize = font_size + 10;
            $(this).css("font-size",newSize + 'px');
        }).on('mouseout','.wordCloud',function(){
            var font_size = parseFloat($(this).css("font-size"));
            var newSize = font_size - 10;
            $(this).css("font-size",newSize + 'px');
        });
  
  });
 
 </script>
 
 <body>
 <div style="border:thin solid red;align:center">
  <div id="wordCloud" style="width:500px;height:500px;border:thin solid black;margin:0 auto">
  </div>
 </div>  
 
 <select id="shape" class="pull-right" style="height: 27px;width: 100px;margin: 3px" type="select">
  <option value='1' selected="selected">雲朵</option>
  <option value='2' >星星</option>
  <option value='3'>五角大廈</option>
  <option value='4'>鑽石</option>
  <option value='5'>金字塔</option>
 </select>
 </body>
 <button class="" id="updateButton">Update</button>

</html>

2016年9月8日 星期四

jQuery 動態加載內容(Ajax or append) 事件綁定無效解決辦法:.on()

參考:
http://www.polarxiong.com/archives/jQuery-Ajax%E5%8A%A8%E6%80%81%E5%8A%A0%E8%BD%BD%E5%86%85%E5%AE%B9on-%E7%BB%91%E5%AE%9A%E4%BA%8B%E4%BB%B6%E6%97%A0%E6%95%88%E7%9A%84%E8%A7%A3%E5%86%B3%E6%96%B9%E6%B3%95.html

1.Problem:
- 新增的『元素』讀取不到『事件』

2.Example:
- new botton 綁定『click』事件 → 出現 alert()
- 但只有寫死的有效,動態加載的卻失效
- 舉例:
<!doctype html>
<html>
 <head>
  <meta charset="utf-8">
  <link rel="stylesheet" href="cssName.css">
  <script src="https://ajax.googleapis.com/ajax/libs/jquery/1.12.4/jquery.min.js"></script>
  <title>aaa</title>
  
  <script>
  $(function(){
   $('#btn').click(function(){
    $('#the_div').append('<button>new button</button>');
   })

   $("#the_div button").click(function(){
    alert('clicked');
   }) 
   
  });

  </script>
 </head>
 <body>
 
  <div id="the_div">
   <button>new button</button>
  </div>
  
  <button id="btn">test</button>
 </body>

3.Why
- 第一次$(function(){}) 載入html時,只有寫死的new botton有被『註冊』
- 後面動態加載的並沒有被載入

4.Solution
- 使用.on方式
- $( document ).on( events, selector, data, handler );
- 舉例,將方法置換成下列程式

$(document).on('click','#the_div button',function(){
 alert('clicked');
})

2016年9月1日 星期四

超連結 Html anchor link & jQuery animate scrollTop 滑動

1.Html anchor link

- 注意: 
a.目前anchor都已改為id="myTestAnchor"設定
b.name="id="myTestAnchor"的設定名義上已取消,
但依然可以使用(name 只能跟<a name="myTestAnchor">test</a>搭配)

-範例:

a.設定連結(要連到哪裡??)
<a href="#mytest">按我Html超連結</a>

b.設定anchor(錨點)
<h1 id="mytest">超連結終點</h1>


2.jQuery animate + scrollTop 超連結滑動

- 注意:
a. 選取 class 為 "intro"、"demo" 或 "end" 的所有元素:$(".intro,.demo,.end")
b. $('#test').offset().top 為 利用 .offset() 的方式來取得指定元素的 top 位置

-範例:
a. 功能:當id="myClick"元素被點擊時,滑動到id="test"的元素上面
b.. offset().top-100:可以控制滑動後畫面要停止在哪裡,不一定要把該元素升到最頂
c.範例程式碼:
$(function(){
     $('#myClick').click(function(){
        $('html , body').animate({scrollTop:$('#test').offset().top-100},800);
     });
});

3.完整範例
<!doctype html>
<html>
 <head>
  <meta charset="utf-8">
  <link rel="stylesheet" href="">
  <script src="https://ajax.googleapis.com/ajax/libs/jquery/1.12.4/jquery.min.js"></script>
  <script src=""></script>
  <title>aaa</title>
  
  <script>
   $(function(){
    $('#myClick').click(function(){
     $('html , body').animate({scrollTop:$('#test').offset().top-100},800);
    });

   });
  </script>
  
 </head>
 <body>
  <button id="myClick">按我jQuery滑動</button>
  <a href="#mytest">按我Html超連結</a>
  </br>
  </br>
  </br>
  </br>
  </br>
  </br>
  </br>
  </br>
  </br>
  </br>
  </br>
  </br>
  </br>
  </br>
  </br>
  </br>
  </br>
  </br>
  </br>
  </br>
  </br>
  </br>
  </br>
  </br>
  </br>
  </br>
  </br>
  </br>
  </br>
  </br>
  </br>
  </br>
  </br>
  </br>
  </br>
  </br>
  </br>
  </br>
  </br>
  <h1 id="test">滑動終點</H1>
  </br>
  </br>
  </br>
  </br>
  </br>
  </br>
  </br>
  </br>
  </br>
  </br>
  </br>
  </br>
  </br>
  </br>
  </br>
  </br>
  </br>
  </br>
  </br>
  <h1 id="mytest">超連結終點</H1>
  </br>
  </br>
  </br>
  </br>
  </br>
  </br>
  </br>
  </br>
  </br>
  </br>
  </br>
  </br>
  </br>
  </br>
  </br>
  </br>
  </br>
  </br>
  </br>
  </br>
  </br>
  </br>
  </br>
  </br>
  </br>
  </br>
  </br>
  </br>
  </br>
  </br>
  </br>
  </br>
  </br>
  </br>
  </br>
  </br>
  </br>
  </br>
  </br>
  </br>
  </br>
  </br>
  </br>
  </br>
  </br>
  </br>
  </br>
  </br>
  </br>
  </br>
  </br>
  </br>
  </br>
  </br>
  </br>
  </br>
  </br>
  </br>
  </br>
  </br>
  </br>
  </br>
 </body>

</html>

2016年8月9日 星期二

jQuery attr() prop() 區別

參考來源:
1. http://blog.webgolds.com/view/193
2. http://wenzhixin.net.cn/2013/05/24/jquery_attr_prop

1.attribute 跟 property的區別

- property是DOM中的屬性,『是JavaScript裡的對象』
- attribute是HTML標籤上的屬性,『它的值只能夠是字符串』


一個例子:
<input name="sex" value="男">  

那可以代表著:<input>這個標籤擁有2個屬性:
name="sex"
value="男"
屬性值為『"sex"』&『"男"』
上述兩者即為html標籤上的屬性

第二個例子:
<input type="checkbox" checked=true/>

現在我們透過jquery來測試以上這行,得到以下結果:
語法回傳結果
$('input').prop('checked');true 
$('input').attr('checked');"checked"
看到了不同點了嗎?
『
布林值(DOM屬性)』比『字串值(Html標籤屬性)』。


第三個例子:
<input type="checkbox" />

現在我們透過jquery來測試以上這行,得到以下結果:
語法回傳結果
$('input').prop('checked');false
$('input').attr('checked');undefined
例子中的
1.<input> 沒有設置 checked 
屬性當然也就是輸出 undefined.

2.prop() 獲取的到是對於一 DOM 對象,本身即具有原生的 checked 屬性當然就是輸出 false.


2.效能:.prop() > .attr(),
因為attr()需要訪問 DOM 屬性節點,比較耗時。

3.結論:
當需要獲得/設置checked 、selected、readonly 、disabled 這些DOM屬性時使用 .prop()。 


具有 true 和 false 兩個屬性的屬性,如 checked, selected 或者 disabled 使用prop(),其他的使用 attr(),具體見下表:


jQuery Ajax Practice

Note:
- 實做Ajax中的 load()、.get()、.post()、ajax()方法
- 運作方式:
- 根據不同按鈕,觸發不同的ajax事件,回傳不同的資料,並將回傳的資料塞入指定的div中

1.Html file

<!doctype html>
<html>
 <head>
  <meta charset="utf-8">
  <link rel="stylesheet" href="">
  <script src="https://ajax.googleapis.com/ajax/libs/jquery/1.12.4/jquery.min.js"></script>
  <title>ajax</title>
  <script>
   $(document).ready(function(){
    $("#button1").click(function(){
     $("#result").load("testHtml.html");
    });        
    $("#button2").click(function(){
     $("#result").load("test.txt", function(responseTxt, statusTxt, xhr){
     if(statusTxt == "success")
      alert("External content loaded successfully!");
     if(statusTxt == "error")
      alert("Error: " + xhr.status + ": " + xhr.statusText);
      });
     });          
    $("#button3").click(function(){
     $.get('testHtml.html', {name:"ian",age:"18"},function(data,status){alert(status)});
     alert("haha");
    });    
    
    $("#button4").click(function(){
     $.post('testHtml.html', {name:"ian",age:"18"},function(data,status){alert(status)});
     alert("haha2");
    });    
    $("#button5").click(function(){
     $.ajax({url:"testHtml.html", success:function(result){
      $("#result").html(result);
     }});
    });
   });
  </script>
 </head>
 <body>
  <button id="button1">ajax</button>
  <button id="button2">ajax2</button>
  <button id="button3">ajax3</button>
  <button id="button4">ajax4</button>
  <button id="button5">ajax5</button>
//原畫面的div
  <div style="border:2px red solid;width:200px">
  </div>
  <div id="result">
  </div>
 </body>
</html>

2.test.txt

<h2>jQuery and AJAX is FUN!!!</h2>

<p id="p1">This is some text in a paragraph.</p>

3.testHtml.html

<!doctype html>
<html>
 <head>
  <meta charset="utf-8">
  <link rel="stylesheet" href="">  
  <script src="https://ajax.googleapis.com/ajax/libs/jquery/1.12.4/jquery.min.js"></script>
  <title>aaa</title>  
 </head>
 <body>
  <h2>Hello my name is ajax</h2>
  <div style="border:2px blue solid;width:200px">
  aa
  </div>  
 </body>
</html>

2016年7月20日 星期三

jQuery-分頁顯示

資料來源: https://code.google.com/p/jquery-tablepage/


- 這是一個針對JQuery所開發的表格分頁plugin,
- 主要目的是讓使用者能夠針對現有的資料表格,不需要更改過多的程式碼,即可輕易的加入分頁的功能.

使用說明
步驟1: 引用plugin檔案(這邊用1.0版)


<script src="jquery-tablepage-1.0.js"></script>

步驟2: 針對要分頁的table,與顯示頁碼的span,分別設定一個id(span放在妳想要顯示的位置)
<table id='table_source'>...</table>
<span id='table_page'></span>

步驟3: 執行plugin
$("#table_source").tablepage($("#table_page"), 10);
第二個參數10,代表每一頁要顯示10筆資料

完成結果參考:
<!doctype html>
<html>
<head>
 <meta charset="utf-8">
 <link rel="stylesheet" href="">
 <script src=""></script>
 <title>Main</title>
 <!-- // 引用 jQuery.js 和 jQuery-TablePage.js -->
 <script src="https://ajax.googleapis.com/ajax/libs/jquery/2.1.4/jquery.min.js"></script>
 <script src="jquery-tablepage-1.0.js"></script>
 
</head>
<body>


<table id="tbl" border="1">
    <thead>
  <tr >
   <th align="left" >Name</th>
   <th align="left" >Content</th>
  </tr>
    </thead>
 <tbody>
  <tr>
   <td>Name1</td>
   <td>Content1</td>
  <tr>
  <tr>
   <td>Name2</td>
   <td>Content2</td>
  <tr>
  <tr>
   <td>Name3</td>
   <td>Content3</td>
  <tr>
  <tr>
   <td>Name4</td>
   <td>Content4</td>
  <tr>
  <tr>
   <td>Name5</td>
   <td>Content5</td>
  <tr>
  <tr>
   <td>Name6</td>
   <td>Content6</td>
  <tr>
 </tbody>
</table>
 
<!-- // 放分頁的 HTML 物件 -->
<span id='table_page'></span>


<!-- // 使用 TablePage 功能,參數1是放分頁的 HTML 物件,例如 span,參數2是每頁幾筆 -->
<script>
$("#tbl").tablepage($("#table_page"), 6);
</script>

</body>
<html>