顯示具有 intllj 標籤的文章。 顯示所有文章

2016年9月22日 星期四

Build Spring MVC

內容說明
- 建立Spring MVC
- 含有2種做法(1.一般 2. RequestMapping)

範例環境
- Intellj 13
- Spring 3.2.0
- Tomcat 7.0

前置作業
- 參考下列網址提供之 jar 檔下載
- 參考網址:
http://openhome.cc/Gossip/SpringGossip/FirstSpringMVC.html
http://blog.kenyang.net/2010/10/14/spring-mvcspringjar-spring-webmvc

範例實作
目標:
在index.jsp頁面輸入"字串",透過Spring MVC 將"字串"導到hello.jsp


0.檔案目錄結構


1.Tomcat 運行

2.Spring jar 檔匯入

3.web.xml設定

- 注意事項
a.設定『Tomcat』一啟動要進入的url(可自行決定是否加入)
<welcome-file-list>
    <welcome-file>/index.jsp</welcome-file>
</welcome-file-list>

b.只要任何url後面為.do(例如:http://localhost:8080/hello.do),就會被『導入』到名稱為mvc-dispatcher的servlet

c.該servlet會在進入/WEB-INF/mvc-config.xml 該設定檔讀取設定(servlet-mapping會去找相同名稱的servlet此範例為name=mvc-dispatcher)

d.
如果今天想要強迫Web Container啟動時
1.就要載入特定的Servlet
2.並且指定載入的順序
那麼就需要<load-on-startup>標籤了
<?xml version="1.0" encoding="UTF-8"?>
<web-app xmlns="http://java.sun.com/xml/ns/javaee"
         xmlns:xsi="http://www.w3.org/2001/XMLSchema-instance"
         xsi:schemaLocation="http://java.sun.com/xml/ns/javaee
    http://java.sun.com/xml/ns/javaee/web-app_2_5.xsd"
         version="2.5">

    <servlet>
        <servlet-name>mvc-dispatcher</servlet-name>
        <servlet-class>org.springframework.web.servlet.DispatcherServlet</servlet-class>
        <init-param>
            <param-name>contextConfigLocation</param-name>
            <param-value>/WEB-INF/mvc-config.xml</param-value>
        </init-param>
        <load-on-startup>1</load-on-startup>
    </servlet>

    <servlet-mapping>
        <servlet-name>mvc-dispatcher</servlet-name>
        <url-pattern>*.do</url-pattern>
    </servlet-mapping>

</web-app>
4.mvc-config.xml 設定

注意:請直接參考code的內容註釋
<?xml version="1.0" encoding="UTF-8"?>
<beans xmlns="http://www.springframework.org/schema/beans"
       xmlns:xsi="http://www.w3.org/2001/XMLSchema-instance"
       xmlns:context="http://www.springframework.org/schema/context"
       xsi:schemaLocation="http://www.springframework.org/schema/beans http://www.springframework.org/schema/beans/spring-beans.xsd http://www.springframework.org/schema/context http://www.springframework.org/schema/context/spring-context.xsd">
    <!--要使用RequestMapping要有下面這句,url進來,到指定的資料夾中找,有設定RequestMapping的Controller-->
    <context:component-scan base-package="main"/>
    <!--RequestMapping結束-->
    <bean id="viewResolver"
          class="org.springframework.web.servlet.view.InternalResourceViewResolver">
        <!--InternalResourceViewResolver的"prefix"、"suffix"屬性會與ModelAndView返回的路徑資訊結合-->
        <!--在servlet requestMapping都會把路徑寫好,所以 打 / 就好)-->
<property name="prefix">
            <value>/</value>
        </property>
        <!--讀取"副檔名".jsp開頭的檔案-->
        <property name="suffix">
            <value>.jsp</value>
        </property>
    </bean>
    <!--第一種MyController沒有用RequestMapping,要特別指定,哪個url進來,要進到哪個controller-->
    <!--若有使用RequestMapping,則不需下面這段-->
    <!--網址為/hello.do進來的request,要進到哪一個controller-->
    <bean name="/hello.do" class="main.MyController">
    </bean>
</beans>
InternalResourceViewResolver 的設定不是必要的,如果沒設,處理請求的元件就必須以字串告知 spring-webmvc,接下來由哪個 URL 組織畫面進行回應,也就是你必須傳回如 "hello.jsp" 這樣的字串,這樣會比較沒有彈性,如上設定 InternalResourceViewResolver 的話,你只要傳回 "hello" 字串,InternalResourceViewResolver 會自動根據 prefix 與 suffix 設定,得知目前實際上要以 "/hello.jsp" 來進行『畫面回應』,將來若想要改為其他回應技術,就只需要修改 XML 檔案。

重點:
所以最後是return『response』回應給傳進來的request

而這個『response』是透過ModeAndView進行組織的,
而『Model 參數』用來攜帶『回應頁面』要用到的資料

5.index.jsp設定
<html>
  <head>
    <title></title>
  </head>
  <body>
      <form action="/hello.do">
        請輸入名子:<input type="text" name="nameInput">
          <input type="submit" value="傳送到一般的Spring">
      </form>

      <form action="/hello2.do">
          請輸入名子:<input type="text" name="nameInput2">
          <input type="submit" value="傳送到requestMapping">
      </form>

  </body>
</html>
6.hello.jsp設定
<html>
<head>
    <title></title>
</head>
<body>
    <h1>This is Form Normal Spring:Hello  ${nameInput}</h1><br>

    <h1>This is From RequestMapping:Hello   ${nameInput2}</h1>
</body>
</html>
7.使用基本Spring MVC 的Controller
package main;
import org.springframework.web.servlet.ModelAndView;
import org.springframework.web.servlet.mvc.Controller;

import javax.servlet.http.HttpServletRequest;
import javax.servlet.http.HttpServletResponse;

/**
 * Created by ytchen on 2016/9/22.
 */
public class MyController implements Controller{
    public ModelAndView handleRequest(HttpServletRequest req,
                                      HttpServletResponse res)
            throws Exception {
        //取得index.jsp輸入的名子
        String name = req.getParameter("nameInput");

        //參數1:要傳到哪個jsp;參數2:該物件的屬性名稱(前台取值用)參數3:要傳遞的物件或值
        return new ModelAndView("hello", "nameInput", name);
    }
}
8.使用@RequestMapping Spring 的Controller

- 注意事項
- @RequestMapping 有2種標註方式,一種是標在class,一種是標在method。
- Class類別使用@Controller 標記為Controller
- 請參考:
http://www.blogjava.net/fancydeepin/archive/2014/08/15/springmvc-tutorial-02.html
http://www.cnblogs.com/zhangshitong/p/5195746.html
package main;

import org.springframework.stereotype.Controller;
import org.springframework.web.bind.annotation.RequestMapping;
import org.springframework.web.bind.annotation.RequestMethod;
import org.springframework.web.servlet.ModelAndView;

import javax.servlet.http.HttpServletRequest;

/**
 * Created by ytchen on 2016/9/22.
 */
@Controller
public class MyController2 {

    @RequestMapping(value = "/hello2.do", method = {RequestMethod.POST, RequestMethod.GET})
    public ModelAndView hello(HttpServletRequest request) {

        //取得index.jsp輸入的名子
        String name = request.getParameter("nameInput2");

        //將request傳到指定jsp
        ModelAndView mav = new ModelAndView("hello");
        mav.addObject("nameInput2", name);
        return mav;
    }
}
9.運行畫面
a.index.jsp


b.按下傳送到一般的Spring


c.按下傳送到requestMapping

2016年9月10日 星期六

How To Generate Hibernate Entity With Intellj

說明
- 利用Intellj 連接SQLServer DataBase ,並自動產生Hibernate Entity
- Hibernate 設定檔設置

環境
- Intellj 13
- SQLServer 2012

1.Intellj 連接資料庫

a.建立連線
- 點擊最右側Database長條圖示
- 點擊 + 號新增Database資源連線
- 選擇Driver (此範例使用jTds)
SQL Server有2種不同Driver,以下範例使用jTds(不同Driver後面的設定會有些許不同)


b.帳密設定
- Database:"輸入資料庫名稱"
- User:"輸入帳號"
- Password:"輸入密碼"
- 按下 Test Connection 測試連線,若成功連線,會有下列的圖示的跳出視窗


c.確認Table
選擇scheme & Table
- 檢查是否與該資料庫內容一樣


d.替 Intellj 加入 Hibernate Mapping功能
- 成功開啟後,最左邊的欄位,會出現Persistence的長條功能鍵


e.Mapping  Hibernate 與 Database(建立兩者關係)
- 點擊Persistence長條
- 選擇poc(此專案叫poc)並點擊右鍵
- Genetate Persistence Mapping → By DatabaseScheme


2.Generate Hibernate Entity
- Choose Data Source:選擇上面設定的連線資源
- Package:選擇產出後,要放至哪個路徑
- 需要一些時間來跑
- 找到目標Table (範例Table為:user_information),並點擊勾選

設定檔相關勾選:
1. Add to Scheme Factory:將該xml連線加入指定的xxxx.cfg.xml

2. Generate Column Properties:是某將DB欄位的相關屬性
(流水號identity、資料長度、not null...顯示在hbm.xml上面)


3.Generate SeparateXML per Entity:是否要產生XML檔(本範例不勾選)


若沒有出現任何Table:對著空白處按下『右鍵』,RefreshTable


3.成功產出畫面


4.額外補充 - SQLServer Driver設定不同處

- 在xxxx.hcfg.xml設定檔中

a.Microsoft


b.jTds


c.Mapping至對映的entity檔案(有無產xml檔,會有不同寫法)

2016年9月5日 星期一

Intellj Java Command Line (命令列參數) 使用

1.注意:
- command line 參數以『String [ ]』的方式存放,所以也要用同樣方式『接』
- command line 參數,『最先進入』的地方是『main方法』

2.範例:
a. Intellj 輸入指令 ( Program arguments: Ian Lillian)(指令間用空白隔開)


b.main方法,透過String[] 接到參數


c.看結果


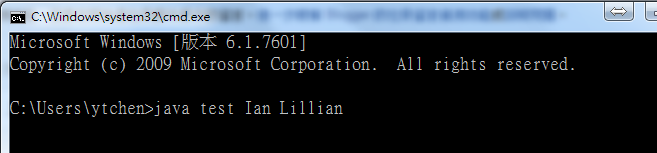
3.補充-cmd 如何帶參數
- command line 輸入指令(帶在要執行的檔案後面)
- 執行前需要先進行javac 編譯
- javac test.java
- 執行java檔


2016年7月22日 星期五

建置第一個Hibernate In Intellj

環境配置:

  • Intellj 1.4
  • JDBC4
  • Hibernate jar (少其中一個可能都會出錯)


內容參考至:


Step1.檔案結構目錄
Step2.設置hibernate.cfg.xml
<hibernate-configuration>
    <session-factory>
        <!-- 顯示實際操作資料庫時的SQL -->
        <property name="show_sql">true</property>
        <!-- 將顯示的SQL排版,方便觀看 -->
        <property name="format_sql">true</property>
        <!-- SQL方言,這邊設定的是SQLServer -->
        <property name="dialect">org.hibernate.dialect.SQLServerDialect</property>
        <!-- JDBC驅動程式 -->
        <property name="connection.driver_class">com.microsoft.sqlserver.jdbc.SQLServerDriver</property>
        <!-- JDBC URL -->
        <property name="connection.url">jdbc:sqlserver://127.0.0.1:1433;DatabaseName=testdb</property>
        <!-- 資料庫使用者 -->
        <property name="connection.username">sa</property>
        <!-- 資料庫密碼 -->
        <property name="connection.password">578989</property>
        <!-- 物件與資料庫表格映射文件 -->
        <mapping resource="User.hbm.xml">
    </mapping></session-factory>
</hibernate-configuration>


Step3.設置User.hbm.xml
-重點注意事項
1.資料庫每個欄位都要記得設定到<property>
2.其中id是個特殊的屬性,Hibernate會使用它來作為主鍵識別,您可以定義主鍵產生的方式,這是在XML映射文件中完成
<?xml version="1.0" encoding="utf-8"?>
<!DOCTYPE hibernate-mapping
        PUBLIC "-//Hibernate/Hibernate Mapping DTD 3.0//EN"
        "http://hibernate.sourceforge.net/hibernate-mapping-3.0.dtd">

<hibernate-mapping>
    <!--<class>標籤的name屬性為所映射的物件,而table為所映射的表格;-->
    <class name="Hibernate.UserInformationEntity" table="user_information">
        <id name="id" column="id"> <!--<id>中 column屬性指定了表格欄位,而 type屬性指定了User實例的中的id之型態。-->
            <generator class="native"/> <!--<id>中主鍵的產生方式在這邊設定為"native",表示主鍵的生成方式由Hibernate根據資料庫Dialect 的定義來決定-->
            <!--<generator class="identity"/>-->
            <!--identity-->
        </id>
        <!--<property>標籤中的column與type都各自指明了表格中欄位與物件中屬性的對應。-->
        <property name="account" column="account"/>
        <property name="name" column="name"/>
        <property name="age" column="age"/>
        <property name="create_time" column="create_time"/>
    </class>
</hibernate-mapping>


Step4.建立實體,與表格對應
-重點注意事項
1.資料庫欄位『型態是甚麼』,實體就要設一樣,否則會出錯
ex.資料庫:age int not null  實體:int age;
public class UserInformationEntity {
    int id =0;
    String account;
    String name;
    int age = 0;
    Date create_time;
    public int getId() {
        return id;
    }
    public void setId(int id) {
        this.id = id;
    }
    public String getAccount() {
        return account;
    }
    public void setAccount(String account) {
        this.account = account;
    }
    public String getName() {
        return name;
    }
    public void setName(String name) {
        this.name = name;
    }
    public int getAge() {
        return age;
    }
    public void setAge(int age) {
        this.age = age;
    }
    public Date getCreate_time() {
        return create_time;
    }
    public void setCreate_time(Date create_time) {
        this.create_time = create_time;
    }
}
Sept5.設定SessionFactory實例,連線用 
-重點注意事項  
1.也可直接寫在main class之中,一個應用程式當中通常只需要一個SessionFactory實例, 為了方便整個應用取得同一個SessionFactory實例, 可以撰寫一個HibernateUtil類別 
2.要如何寫在main class可參考: http://blog.csdn.net/zs234/article/details/9108533
package Hibernate;
import org.hibernate.SessionFactory;
import org.hibernate.cfg.Configuration;
/**
 * Created by ytchen on 2016/7/22.
 */
public class HibernateUtil {
    private static SessionFactory sessionFactory;
    static {
        try {
            sessionFactory = new Configuration().configure()
                    .buildSessionFactory();
        } catch (Throwable ex) {
            throw new ExceptionInInitializerError(ex);
        }
    }
    public static SessionFactory getSessionFactory() {
        return sessionFactory;
    }
    public static void shutdown() {
        getSessionFactory().close();
    }
Sept6.馬上來試用Hibernate吧 
package Hibernate;

import org.hibernate.Transaction;

import org.hibernate.Session;


import java.util.Date;


/**

 * Created by ytchen on 2016/7/22.

 */

public class HibernateDemo {

    public static void main(String[] args) {

        UserInformationEntity user = new UserInformationEntity();

        user.setAccount("Ian");

        user.setName("Ian");

        user.setAge(20);

        user.setCreate_time(new Date());


        // 開啟Session,相當於開啟JDBC的Connection

        Session session = HibernateUtil.getSessionFactory().openSession();

        // Transaction表示一組會話操作

        Transaction tx= session.beginTransaction();

        // 將物件映射至資料庫表格中儲存

        session.save(user);

        tx.commit();

        session.close();


        System.out.println("新增資料OK!請用Sqlserver觀看結果!");


        HibernateUtil.shutdown();

    }

}