Sample Step:
1.Download word cloud jquery:
http://mistic100.github.io/jQCloud/#usage
2.Include package & jQuery CDN
- jqcloud.min.js- jqcloud.min.css
- jqcloud.min.js- jqcloud.min.js
- https://ajax.googleapis.com/ajax/libs/jquery/1.12.4/jquery.min.js
- 程式碼
<head>
 <meta charset="utf-8">
 <script src="https://ajax.googleapis.com/ajax/libs/jquery/1.12.4/jquery.min.js"> </script>
 <script src="jqcloud.min.js"></script>
 <link rel="stylesheet" href="jqcloud.min.css">
 <title>test</title>
</head>
3.設定『資料』 & 啟用文字雲
- 要記得給文字雲『
範圍大小』,否則畫面上看不到
$('#keywords').jQCloud(words, {
  width: 500,
  height: 350
});
- 設定假資料
<script>
$(function(){
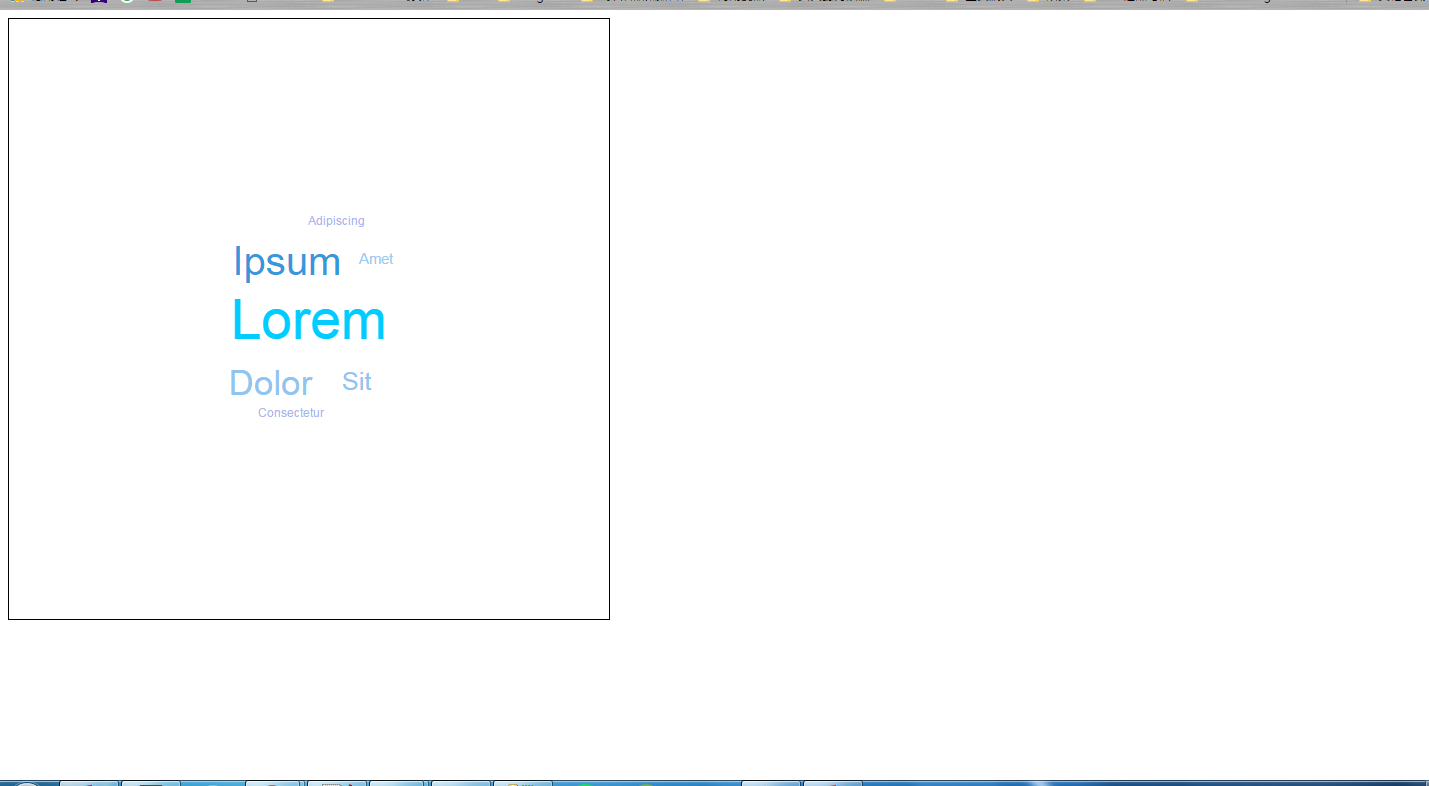
var words = [
{text: "Lorem", weight: 13},
{text: "Ipsum", weight: 10.5},
{text: "Dolor", weight: 9.4},
{text: "Sit", weight: 8},
{text: "Amet", weight: 6.2},
{text: "Consectetur", weight: 5},
{text: "Adipiscing", weight: 5},
];
<!-- $('#demo').jQCloud(words); -->
$('#demo').jQCloud(words, {
width: 600,
height: 600
});
});
</script>
4.Result
5.Sample code
<!doctype html>
<html>
 <head>
  <meta charset="utf-8">
  <script src="https://ajax.googleapis.com/ajax/libs/jquery/1.12.4/jquery.min.js"> </script>
  <script src="jqcloud.min.js"></script>
  <link rel="stylesheet" href="jqcloud.min.css">
  <title>test</title>
 </head>

 <script>
 $(function(){
  var words = [
    {text: "Lorem", weight: 13},
    {text: "Ipsum", weight: 10.5},
    {text: "Dolor", weight: 9.4},
    {text: "Sit", weight: 8},
    {text: "Amet", weight: 6.2},
    {text: "Consectetur", weight: 5},
    {text: "Adipiscing", weight: 5},
  ];

  <!-- $('#demo').jQCloud(words); -->

  $('#demo').jQCloud(words, {
    width: 600,
    height: 600
  });
 });

 </script>
 <body>
  <div id="demo" style="border:thin solid black">
  </div>
 </body>

</html>
6.Advance Skill
[自訂設定]
- delay: 50 (字體顯示的速度)
- steps : Number of "steps" to map the words on, depending on their weight (大約會有幾種字體大小,會與自設的color進行比對)
- colors: 自訂顏色
-from-to: 字體最大-最小(根據container的大小)
$('#wordCloud').jQCloud(words, {
    delay: 50,
    width: 500,
    height: 500,
    autoResize: true,
    steps : 50,
    //最凸顯
    colors: ["#CC0066", "#CC0066", "#009999", "#009999", "#FFCC33", "#FFCC33", "#0099CC", "#0099CC", "#FF6666","#FF6666",
        "#FF33CC", "#FF33CC", "#FF6600", "#FF6600", "#009966", "#009966", "#CC6633", "#CC6633", "#FF6666","#FF6666",
        "#555555", "#555555", "#555555", "#555555", "#555555", "#444444", "#444444", "#444444", "#444444","#444444",
        "#666633", "#666633", "#666633", "#666633", "#666699", "#666666", "#666666", "#666666", "#666666","#666666",
        "#333333", "#333333", "#333333", "#333333", "#333333", "#999999", "#999999", "#999999", "#999999","#999999"
    ],
    fontSize: {
        from: 0.08,
        to: 0.02
    }
});
[文字雲特殊效果(字體隨滑鼠移出移入改變)]
//文字雲特殊效果
$(document).on('mouseenter','.jqcloud-word',function(){
    var font_size = parseFloat($(this).css("font-size"));
    var newSize = font_size + 10;
    $(this).css("font-size",newSize + 'px');
}).on('mouseout','.jqcloud-word',function(){
    var font_size = parseFloat($(this).css("font-size"));
    var newSize = font_size - 10;
    $(this).css("font-size",newSize + 'px');
});
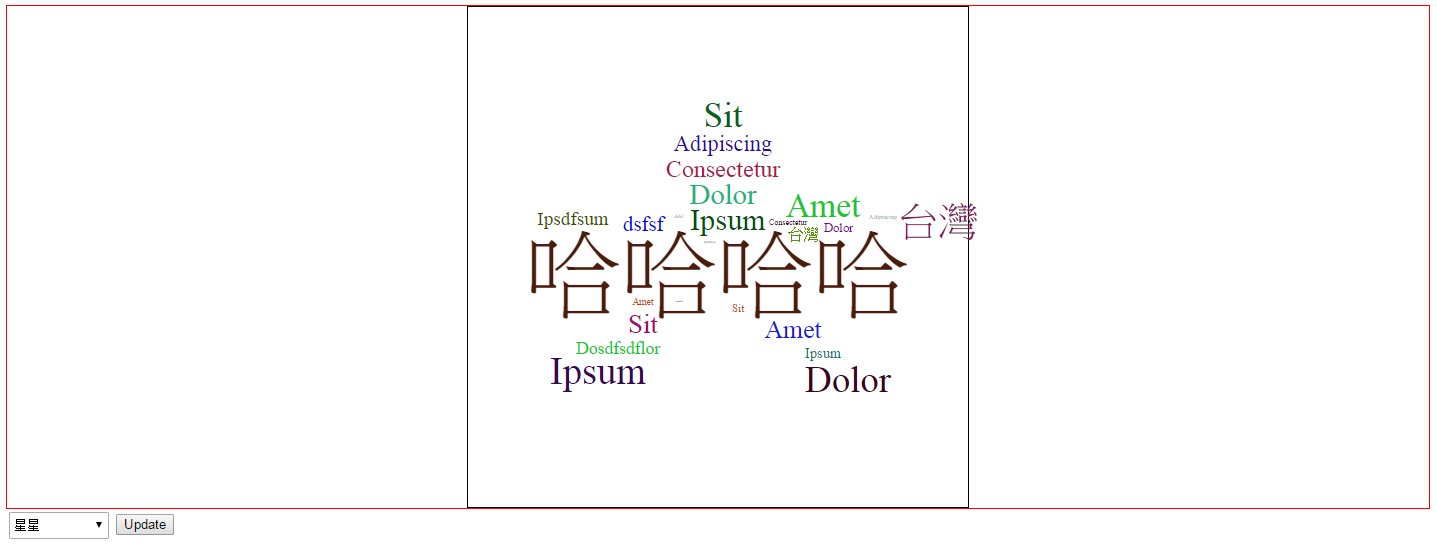
[使用者可調整"字體顏色"、文字雲型狀]
1.按下"更新"
2.刪掉文字雲
3.重建文字雲
//delete
wordCloud.jQCloud('destroy');
//update word cloud
wordCloud.jQCloud(words, {
    delay: 40,
    width: width,
    height: height,
    autoResize: true,
    steps : 50,
    colors: colorStyle,
    shape: shape,
    fontSize: {
        from: 0.08,
        to: 0.02
    }
});
4.sample code
//文字雲update
$('#updateButton').on('click', function() {
    var wordCloud = $('#wordCloud');
    var selectColorStyle = $('#colorStyle').val();
    var selectShape = $('#shape').val();
    var colorStyle;
    //custom color style
    if (selectColorStyle == '1') {
        colorStyle = ["#CC0066", "#CC0066", "#009999", "#009999", "#FFCC33", "#FFCC33", "#0099CC", "#0099CC", "#FF6666","#FF6666",
            "#FF33CC", "#FF33CC", "#FF6600", "#FF6600", "#009966", "#009966", "#CC6633", "#CC6633", "#FF6666","#FF6666",
            "#555555", "#555555", "#555555", "#555555", "#555555", "#444444", "#444444", "#444444", "#444444","#444444",
            "#666633", "#666633", "#666633", "#666633", "#666699", "#666666", "#666666", "#666666", "#666666","#666666",
            "#333333", "#333333", "#333333", "#333333", "#333333", "#999999", "#999999", "#999999", "#999999","#999999"
        ];
    } else if (selectColorStyle == '2') {
        colorStyle = ["#CC0066", "#CC0066", "#009999", "#009999", "#FFCC33", "#FFCC33", "#0099CC", "#0099CC", "#FF6666","#FF6666",
            "#FF33CC", "#FF33CC", "#FF6600", "#FF6600", "#009966", "#009966", "#CC6633", "#CC6633", "#FF6666","#FF6666",
            "#3399CC", "#3399CC", "#CC6600", "#CC6600", "#999999", "#444444", "#444444", "#444444", "#444444","#444444",
            "#666633", "#666633", "#666633", "#666633", "#666699", "#666666", "#666666", "#666666", "#666666","#666666",
            "#333333", "#333333", "#333333", "#333333", "#333333", "#999999", "#999999", "#999999", "#999999","#999999"
        ];
    } else if (selectColorStyle == '3') {
        colorStyle = ["#CC0066", "#CC0066", "#009999", "#009999", "#FFCC33", "#FFCC33", "#0099CC", "#0099CC", "#FF6666","#FF6666",
            "#FF33CC", "#FF33CC", "#FF6600", "#FF6600", "#009966", "#009966", "#CC6633", "#CC6633", "#FF6666","#FF6666",
            "#3399CC", "#3399CC", "#CC6600", "#CC6600", "#999999", "#999999", "#CCCC33", "#CCCC33", "#CCCC33","#CCCC33",
            "#FF9933", "#FF9933", "#CC9999", "#CC9999", "#666699", "#666699", "#FF9900", "#FF9900", "#0099CC","#0099CC",
            "#CCCC99", "#CCCC99", "#FF6666", "#FF6666", "#FFCC99", "#FFCC99", "#CC3399", "#CC3399", "#99CC33","#99CC33"
        ];
    }
    //custom shape
    var width;
    var height;
    var shape;
    if (selectShape == '1') {
        width = 550;
        height = 400;
        shape = 'elliptic';
    } else if (selectShape == '2') {
        width = 500;
        height = 500;
        shape = 'elliptic';
    } else {
        width = 550;
        height = 400;
        shape = 'rectangular';
    }
    //delete
    wordCloud.jQCloud('destroy');
    //update word cloud
    wordCloud.jQCloud(words, {
        delay: 40,
        width: width,
        height: height,
        autoResize: true,
        steps : 50,
        colors: colorStyle,
        shape: shape,
        fontSize: {
            from: 0.08,
            to: 0.02
        }
    });
});
Word Cloud 2
1.下載:
https://timdream.org/wordcloud2.js/#red-chamber
2.Sample Code:
<!doctype html>
<html>
 <head>
  <meta charset="utf-8">
  <script src="https://ajax.googleapis.com/ajax/libs/jquery/1.12.4/jquery.min.js"> </script>
  <script src="wordcloud2.js"></script>
  <title>test</title>
 </head>

 <script>
 $(function(){
  var words = [
   ["哈哈哈哈",60],
   ["Ipsum",19],
   ["Dolor",18],
   ["Sit",17],
   ["Amet",16],
   ["Consectetur",15],
   ["Adipiscing",14],
   ["dsfsf",13],
   ["Ipsdfsum",12],
   ["Dosdfsdflor",11],
   ["台灣",10],
   ["Ipsum",9],
   ["Dolor",8],
   ["Sit",7],
   ["Amet",6],
   ["Consectetur",5],
   ["Adipiscing",4],
   ["dsfsf",3],
   ["Ipsdfsum",2],
   ["Dosdfsdflor",1],
   ["台灣",25],
   ["Ipsum",24],
   ["Dolor",23],
   ["Sit",22],
   ["Amet",21],
  ];

  WordCloud($('#wordCloud')[0], {
            list: words,
            classes: 'wordCloud',
            wait: 30,
            gridSize: 10,
            weightFactor: 1.6,
            fontFamily: 'Hiragino Mincho Pro, serif',
            color: 'random-dark',
            backgroundColor: '#FFFFFF',
            rotateRatio: 0
        });
        //文字雲update
        $('#updateButton').on('click', function() {
            //custom shape
            var selectShape = $('#shape').val();
            var shape;
            if (selectShape == '1') {
                shape = 'circle';
            } else if (selectShape == '2') {
                shape = 'star';
            } else if (selectShape == '3') {
                shape = 'pentagon';
            } else if (selectShape == '4'){
                shape = 'diamond';
            } else if (selectShape == '5') {
                shape = 'triangle';
            }
            WordCloud($('#wordCloud')[0], {
                list: words,
                classes: 'wordCloud',
                wait: 30,
                shape: shape,
                gridSize: 10,
                weightFactor: 1.6,
                fontFamily: 'Hiragino Mincho Pro, serif',
                color: 'random-dark',
                backgroundColor: '#FFFFFF',
                rotateRatio: 0
            });
        });
        //文字雲特殊效果
        $(document).on('mouseenter','.wordCloud',function(){
            var font_size = parseFloat($(this).css("font-size"));
            var newSize = font_size + 10;
            $(this).css("font-size",newSize + 'px');
        }).on('mouseout','.wordCloud',function(){
            var font_size = parseFloat($(this).css("font-size"));
            var newSize = font_size - 10;
            $(this).css("font-size",newSize + 'px');
        });

  });

 </script>

 <body>
 <div style="border:thin solid red;align:center">
  <div id="wordCloud" style="width:500px;height:500px;border:thin solid black;margin:0 auto">
  </div>
 </div>

 <select id="shape" class="pull-right" style="height: 27px;width: 100px;margin: 3px" type="select">
  <option value='1' selected="selected">雲朵</option>
  <option value='2' >星星</option>
  <option value='3'>五角大廈</option>
  <option value='4'>鑽石</option>
  <option value='5'>金字塔</option>
 </select>
 </body>
 <button class="" id="updateButton">Update</button>

</html>